终于来了,事件循环!

什么是事件循环?

这就要牵扯很多概念了。首先,拆解来看。

  • 事件:应该都很熟悉了,之前写过发布订阅提到了事件机制。我的理解是,js 作为一门脚本语言,为了完成我们程序员给它指定的各种任务,就必须要有个机制来跟我们交互。知道何时应该接受输入,何时做出计算处理,然后何时给出处理结果并予以输出反馈。而事件机制就很好地完成了这些。与此同时,js 的运行环境(这里当然暂时指浏览器和 node,deno 再发展发展,哈哈)不仅完成了上述的任务,同时还实现了许多别的事情。浏览器的终极目标是渲染网页,让用户能够看到网页所展示的信息;而 node 没有图形界面,但能够完成各种 IO 操作,也是程序员的好帮手。
  • 循环:字面意思看来,应该也是一种策略或是机制。即重复这个事件处理的过程,通过一个个的事件处理,并循环往复,最终完成它所有的任务,实现它的价值(最终应该也是不准确的,可以理解为一段时间内)。

浏览器的事件循环

  • 进程和线程
    首先,说说进程和线程。
  • node 的事件循环
  • 微任务
  • 宏任务
  • 浏览器和 node 的差别

来了来了,防抖节流!

老生常谈,防抖节流

  • 老样子,首先剖析概念
  • 先看防抖:英语 debounce。先看 bounce,反弹、弹跳的意思。那加个 de 前缀,学过点英语就知道,表否定。所以 debounce 是让它别反弹、弹跳,综合理解,即我们常说的去抖动,防抖。
  • 那防抖跟我们编程有啥关系?在网页中,有一些事件是会触发非常频繁的,比如鼠标移动(onmousemove),键盘输入(onkeypress 如果你打字速度够快的话),还有窗口大小调整时的 onresize 等等。
  • 发现了吗,有点联系了,频繁和弹跳,我们理解为同义。想象一个弹力球扔在地上,它一定会反弹起来数次,最终停在地上。就像上述的那些事件一样,触发太频繁,但最终会稳定。这里事件的稳定我们认为就是一段时间内没有触发。
  • 所以对于不稳定的事件,我们不需要也不太容易知道它如此频繁的每一次的不同状态。我们要做的是,等它稳定了,不抖动了,不弹跳了,再去做一些处理。这样能够有效节约资源,且不会丢失关键的信息和逻辑。类比一下更通俗的例子,电梯和公交车,门开了,都是不停的上人,门就不能关,必须等没人上了,准确说是一段时间内没人上了,才能关门,所以这就是防抖。
  • 具体到代码,怎么实现呢?这就用到了鼎鼎大名的闭包。一句话即函数外用到了函数内的变量。先来最简版:
1
2
3
4
5
6
7
8
9
10
11
12
13
14
15
16
17
const test1 = function (e) {
console.log("test1", e, this); // 普通测试函数,打印事件e和this,就别用箭头函数了
};
let timer; // 借助了全局变量
const test2 = function (e) {
// console.log(timer); // 可以看看每次的timer是什么
if (timer) {
clearTimeout(timer); // 如果没有到1000ms,就清掉计时器
}
timer = setTimeout(() => {
// 不管有没有清理计时器,都要开始计时,即延时执行函数
console.log("test2", e, this);
}, 1000);
};
const target = document.getElementsByTagName("body")[0];
target.addEventListener("keypress", test1);
target.addEventListener("keypress", test2);
  • 可以看到效果就是,test1 一直触发,不做任何限制,即我们所说的抖动。
  • 而 test2 是人为地去掉了所有抖动的触发,即忽略掉了抖动中,也就是限定时间内的频繁执行,我们清理了定时器,则自然回调不会被执行。而如果过了限定的时间,则定时器会自动触发一次之前缓存的函数。
  • 有个问题,这里例子不通用,还用到了全局变量,那如果想复用这个操作咋办?简单,闭包!
1
2
3
4
5
6
7
8
9
10
11
12
13
14
15
16
17
18
19
20
21
22
23
// 封装一个包裹函数,返回去掉了抖动的函数
const debounce = (func, wait) => {
let timer; // 从原来的全局变量变成了闭包,是不是闭包理解又深刻了!
// 注意这里不能用箭头函数
return function () {
// console.log(timer); // 可以看看每次的timer是什么
if (timer) {
clearTimeout(timer);
}
timer = setTimeout(() => {
func.apply(this, arguments); //apply,call,bind的区别是什么,哈哈哈引申狂魔
}, wait);
};
};
const test1 = function (e) {
console.log("test1", e, this);
};
const test2 = function (e) {
console.log("test2", e, this);
};
const target = document.getElementsByTagName("body")[0];
target.addEventListener("keypress", test1);
target.addEventListener("keypress", debounce(test2, 1000));
  • 上述例子实现了复用防抖逻辑,还专门处理了 this,但还有个问题,如果这个事件就是一直触发,不停咋办?那我们封装的防抖就永远不能执行,如果想让它至少先来执行一次,怎么改改?
1
2
3
4
5
6
7
8
9
10
11
12
13
14
15
16
17
18
19
20
21
22
23
24
25
26
27
28
29
30
31
32
33
// 封装一个包裹函数,返回去掉了抖动的函数
const debounce = (func, wait, immediate) => {
let timer; // 从原来的全局变量变成了闭包,是不是闭包理解又深刻了!
let callNow;
// 注意这里不能用箭头函数
const debounced = function () {
// console.log(timer); // 可以看看每次的timer是什么
if (timer) {
clearTimeout(timer);
}
if (immediate) {
// 若需要立即执行,记录一个状态
callNow = !timer;
timer = setTimeout(() => {
timer = null; // 改变了timer,下次再执行时就又开始一轮新的循环,会立即执行
}, wait);
if (callNow) func.apply(this, arguments);
} else {
timer = setTimeout(() => {
func.apply(this, arguments); //apply,call,bind的区别是什么,哈哈哈引申狂魔
}, wait);
}
};
};
const test1 = function (e) {
console.log("test1", e, this);
};
const test2 = function (e) {
console.log("test2", e, this);
};
const target = document.getElementsByTagName("body")[0];
target.addEventListener("keypress", test1);
target.addEventListener("keypress", debounce(test2, 1000, true));
  • 好了,防抖差不多了。那啥是节流呢?throttle 意为节流阀,油门等,顾名思义,就是限制流量,限制事件触发的次数。
  • 之所以把它俩放一起写,肯定有原因的。比较相似:防抖是一堆事件只执行一次(最后一次或第一次)。而节流是一堆事件中,在固定时间内最多执行一次,也可能不执行。也可以理解为,在固定时间内的防抖,仔细想想,是不是这个道理?
  • 节流也是先来最简版实现吧,其实就在防抖基础上改两行!
1
2
3
4
5
6
7
8
9
10
11
12
13
14
15
16
17
18
19
20
21
22
23
24
// 封装一个包裹函数,返回节流后的函数
const throttle = (func, wait) => {
let timer; // 从原来的全局变量变成了闭包,是不是闭包理解又深刻了!
// 注意这里不能用箭头函数
return function () {
// console.log(timer); // 可以看看每次的timer是什么
if (timer) {
return; //改动一:如果定时器还在,就啥也不干
}
timer = setTimeout(() => {
func.apply(this, arguments); //apply,call,bind的区别是什么,哈哈哈引申狂魔
timer = null; //改动二,每次真正执行完,得把计时器变量重置一下,好在下次判断时知道上次的定时已经执行了
}, wait);
};
};
const test1 = function (e) {
console.log("test1", e, this);
};
const test2 = function (e) {
console.log("test2", e, this);
};
const target = document.getElementsByTagName("body")[0];
target.addEventListener("keypress", test1);
target.addEventListener("keypress", throttle(test2, 1000));
  • 上述例子其实利用了一点,就是当触发时间小于设定时间时,就忽略,只有大于或等于设定时间时才会真正执行,即我们设定的定时器回调一定会执行。
  • 这其实又是延后执行的思路。那立即执行呢?当然要借助时间戳了。
1
2
3
4
5
6
7
8
9
10
11
12
13
14
15
16
17
18
19
20
21
22
23
24
25
26
27
28
29
30
31
32
33
34
// 封装一个包裹函数,返回节流后的函数
const throttle = (func, wait, immediate) => {
let timer; // 从原来的全局变量变成了闭包,是不是闭包理解又深刻了!
let previousStamp = 0;
// 注意这里不能用箭头函数
return function () {
if (immediate) {
// console.log(previousStamp); // 可以看看每次的previousStamp是什么
const now = Date.now();
if (now - previousStamp > wait) {
func.apply(this, arguments);
previousStamp = now;
}
} else {
// console.log(timer); // 可以看看每次的timer是什么
if (timer) {
return; //改动一:如果定时器还在,就啥也不干
}
timer = setTimeout(() => {
func.apply(this, arguments); //apply,call,bind的区别是什么,哈哈哈引申狂魔
timer = null; //改动二,每次真正执行完,得把计时器变量重置一下,好在下次判断时知道上次的定时已经执行了
}, wait);
}
};
};
const test1 = function (e) {
console.log("test1", e, this);
};
const test2 = function (e) {
console.log("test2", e, this);
};
const target = document.getElementsByTagName("body")[0];
target.addEventListener("keypress", test1);
target.addEventListener("keypress", throttle(test2, 1000, true));

应用场景

  • 对于防抖,适合多次事件只需一次响应的情况。如

    • 输入框连续输入需要远程校验
    • 判断滚动条是否滑到某一位置
    • 表单提交,连点多次
  • 对于节流,适合频繁事件可以按时间做减法归约来触发。

    • 元素拖拽事件
    • canvas 画画
    • 游戏中动画刷新率

防抖节流与事件循环

  • 有文章提到了可以用 requestAnimationFrame 做节流,用 requestIdleCallback 做防抖,这都是很好的思路。浏览器的原生 api,实现了类似于防抖节流的机制,我们不用费劲自己写了。但是要想直接用于生产,肯定要考虑兼容性,还有功能是否完备等,这块可以引出事件循环后再细细讨论

防抖节流与设计模式

  • 还有文章提到了装饰器模式和观察者模式。仔细想想,也都可以实现的。装饰器实际就是对函数的装饰(封装),观察者则是用防抖或节流函数充当观察者,满足一定条件后再去执行被观察的函数,可以专门写一篇来看看如何实现。
  • 写了这么多,其实都是理解了原理后,通过一点点推论得出来的具体实现。而 underscore 和 lodash 的相关实现,都是将两者类比实现的,且用到很多精妙的技巧。直接贴上最新版代码吧。
  • underscore 的 debounce
1
2
3
4
5
6
7
8
9
10
11
12
13
14
15
16
17
18
19
20
21
22
23
24
25
26
27
28
29
30
31
32
33
34
35
36
37
38
39
40
import restArguments from "./restArguments.js";
import now from "./now.js";

// When a sequence of calls of the returned function ends, the argument
// function is triggered. The end of a sequence is defined by the `wait`
// parameter. If `immediate` is passed, the argument function will be
// triggered at the beginning of the sequence instead of at the end.
export default function debounce(func, wait, immediate) {
var timeout, previous, args, result, context;

var later = function () {
var passed = now() - previous;
if (wait > passed) {
timeout = setTimeout(later, wait - passed);
} else {
timeout = null;
if (!immediate) result = func.apply(context, args);
// This check is needed because `func` can recursively invoke `debounced`.
if (!timeout) args = context = null;
}
};

var debounced = restArguments(function (_args) {
context = this;
args = _args;
previous = now();
if (!timeout) {
timeout = setTimeout(later, wait);
if (immediate) result = func.apply(context, args);
}
return result;
});

debounced.cancel = function () {
clearTimeout(timeout);
timeout = args = context = null;
};

return debounced;
}
  • underscore 的 throttle
1
2
3
4
5
6
7
8
9
10
11
12
13
14
15
16
17
18
19
20
21
22
23
24
25
26
27
28
29
30
31
32
33
34
35
36
37
38
39
40
41
42
43
44
45
46
47
import now from "./now.js";

// Returns a function, that, when invoked, will only be triggered at most once
// during a given window of time. Normally, the throttled function will run
// as much as it can, without ever going more than once per `wait` duration;
// but if you'd like to disable the execution on the leading edge, pass
// `{leading: false}`. To disable execution on the trailing edge, ditto.
export default function throttle(func, wait, options) {
var timeout, context, args, result;
var previous = 0;
if (!options) options = {};

var later = function () {
previous = options.leading === false ? 0 : now();
timeout = null;
result = func.apply(context, args);
if (!timeout) context = args = null;
};

var throttled = function () {
var _now = now();
if (!previous && options.leading === false) previous = _now;
var remaining = wait - (_now - previous);
context = this;
args = arguments;
if (remaining <= 0 || remaining > wait) {
if (timeout) {
clearTimeout(timeout);
timeout = null;
}
previous = _now;
result = func.apply(context, args);
if (!timeout) context = args = null;
} else if (!timeout && options.trailing !== false) {
timeout = setTimeout(later, remaining);
}
return result;
};

throttled.cancel = function () {
clearTimeout(timeout);
previous = 0;
timeout = context = args = null;
};

return throttled;
}
  • lodash 的 debounce
1
2
3
4
5
6
7
8
9
10
11
12
13
14
15
16
17
18
19
20
21
22
23
24
25
26
27
28
29
30
31
32
33
34
35
36
37
38
39
40
41
42
43
44
45
46
47
48
49
50
51
52
53
54
55
56
57
58
59
60
61
62
63
64
65
66
67
68
69
70
71
72
73
74
75
76
77
78
79
80
81
82
83
84
85
86
87
88
89
90
91
92
93
94
95
96
97
98
99
100
101
102
103
104
105
106
107
108
109
110
111
112
113
114
115
116
117
118
119
120
121
122
123
124
125
126
127
128
129
130
131
132
133
134
135
136
137
138
139
140
141
142
143
144
145
146
147
148
149
150
151
152
153
154
155
156
157
158
159
160
161
162
163
164
165
166
167
168
169
170
171
172
173
174
175
176
177
178
179
180
181
182
183
184
185
186
187
188
189
190
191
192
193
194
195
196
197
198
199
200
201
202
203
204
205
206
207
208
209
210
211
212
213
import isObject from "./isObject.js";
import root from "./.internal/root.js";

/**
* Creates a debounced function that delays invoking `func` until after `wait`
* milliseconds have elapsed since the last time the debounced function was
* invoked, or until the next browser frame is drawn. The debounced function
* comes with a `cancel` method to cancel delayed `func` invocations and a
* `flush` method to immediately invoke them. Provide `options` to indicate
* whether `func` should be invoked on the leading and/or trailing edge of the
* `wait` timeout. The `func` is invoked with the last arguments provided to the
* debounced function. Subsequent calls to the debounced function return the
* result of the last `func` invocation.
*
* **Note:** If `leading` and `trailing` options are `true`, `func` is
* invoked on the trailing edge of the timeout only if the debounced function
* is invoked more than once during the `wait` timeout.
*
* If `wait` is `0` and `leading` is `false`, `func` invocation is deferred
* until the next tick, similar to `setTimeout` with a timeout of `0`.
*
* If `wait` is omitted in an environment with `requestAnimationFrame`, `func`
* invocation will be deferred until the next frame is drawn (typically about
* 16ms).
*
* See [David Corbacho's article](https://css-tricks.com/debouncing-throttling-explained-examples/)
* for details over the differences between `debounce` and `throttle`.
*
* @since 0.1.0
* @category Function
* @param {Function} func The function to debounce.
* @param {number} [wait=0]
* The number of milliseconds to delay; if omitted, `requestAnimationFrame` is
* used (if available).
* @param {Object} [options={}] The options object.
* @param {boolean} [options.leading=false]
* Specify invoking on the leading edge of the timeout.
* @param {number} [options.maxWait]
* The maximum time `func` is allowed to be delayed before it's invoked.
* @param {boolean} [options.trailing=true]
* Specify invoking on the trailing edge of the timeout.
* @returns {Function} Returns the new debounced function.
* @example
*
* // Avoid costly calculations while the window size is in flux.
* jQuery(window).on('resize', debounce(calculateLayout, 150))
*
* // Invoke `sendMail` when clicked, debouncing subsequent calls.
* jQuery(element).on('click', debounce(sendMail, 300, {
* 'leading': true,
* 'trailing': false
* }))
*
* // Ensure `batchLog` is invoked once after 1 second of debounced calls.
* const debounced = debounce(batchLog, 250, { 'maxWait': 1000 })
* const source = new EventSource('/stream')
* jQuery(source).on('message', debounced)
*
* // Cancel the trailing debounced invocation.
* jQuery(window).on('popstate', debounced.cancel)
*
* // Check for pending invocations.
* const status = debounced.pending() ? "Pending..." : "Ready"
*/
function debounce(func, wait, options) {
let lastArgs, lastThis, maxWait, result, timerId, lastCallTime;

let lastInvokeTime = 0;
let leading = false;
let maxing = false;
let trailing = true;

// Bypass `requestAnimationFrame` by explicitly setting `wait=0`.
const useRAF =
!wait && wait !== 0 && typeof root.requestAnimationFrame === "function";

if (typeof func !== "function") {
throw new TypeError("Expected a function");
}
wait = +wait || 0;
if (isObject(options)) {
leading = !!options.leading;
maxing = "maxWait" in options;
maxWait = maxing ? Math.max(+options.maxWait || 0, wait) : maxWait;
trailing = "trailing" in options ? !!options.trailing : trailing;
}

function invokeFunc(time) {
const args = lastArgs;
const thisArg = lastThis;

lastArgs = lastThis = undefined;
lastInvokeTime = time;
result = func.apply(thisArg, args);
return result;
}

function startTimer(pendingFunc, wait) {
if (useRAF) {
root.cancelAnimationFrame(timerId);
return root.requestAnimationFrame(pendingFunc);
}
return setTimeout(pendingFunc, wait);
}

function cancelTimer(id) {
if (useRAF) {
return root.cancelAnimationFrame(id);
}
clearTimeout(id);
}

function leadingEdge(time) {
// Reset any `maxWait` timer.
lastInvokeTime = time;
// Start the timer for the trailing edge.
timerId = startTimer(timerExpired, wait);
// Invoke the leading edge.
return leading ? invokeFunc(time) : result;
}

function remainingWait(time) {
const timeSinceLastCall = time - lastCallTime;
const timeSinceLastInvoke = time - lastInvokeTime;
const timeWaiting = wait - timeSinceLastCall;

return maxing
? Math.min(timeWaiting, maxWait - timeSinceLastInvoke)
: timeWaiting;
}

function shouldInvoke(time) {
const timeSinceLastCall = time - lastCallTime;
const timeSinceLastInvoke = time - lastInvokeTime;

// Either this is the first call, activity has stopped and we're at the
// trailing edge, the system time has gone backwards and we're treating
// it as the trailing edge, or we've hit the `maxWait` limit.
return (
lastCallTime === undefined ||
timeSinceLastCall >= wait ||
timeSinceLastCall < 0 ||
(maxing && timeSinceLastInvoke >= maxWait)
);
}

function timerExpired() {
const time = Date.now();
if (shouldInvoke(time)) {
return trailingEdge(time);
}
// Restart the timer.
timerId = startTimer(timerExpired, remainingWait(time));
}

function trailingEdge(time) {
timerId = undefined;

// Only invoke if we have `lastArgs` which means `func` has been
// debounced at least once.
if (trailing && lastArgs) {
return invokeFunc(time);
}
lastArgs = lastThis = undefined;
return result;
}

function cancel() {
if (timerId !== undefined) {
cancelTimer(timerId);
}
lastInvokeTime = 0;
lastArgs = lastCallTime = lastThis = timerId = undefined;
}

function flush() {
return timerId === undefined ? result : trailingEdge(Date.now());
}

function pending() {
return timerId !== undefined;
}

function debounced(...args) {
const time = Date.now();
const isInvoking = shouldInvoke(time);

lastArgs = args;
lastThis = this;
lastCallTime = time;

if (isInvoking) {
if (timerId === undefined) {
return leadingEdge(lastCallTime);
}
if (maxing) {
// Handle invocations in a tight loop.
timerId = startTimer(timerExpired, wait);
return invokeFunc(lastCallTime);
}
}
if (timerId === undefined) {
timerId = startTimer(timerExpired, wait);
}
return result;
}
debounced.cancel = cancel;
debounced.flush = flush;
debounced.pending = pending;
return debounced;
}

export default debounce;
  • lodash 的 throttle
1
2
3
4
5
6
7
8
9
10
11
12
13
14
15
16
17
18
19
20
21
22
23
24
25
26
27
28
29
30
31
32
33
34
35
36
37
38
39
40
41
42
43
44
45
46
47
48
49
50
51
52
53
54
55
56
57
58
59
60
61
62
63
64
65
66
67
68
69
70
import debounce from "./debounce.js";
import isObject from "./isObject.js";

/**
* Creates a throttled function that only invokes `func` at most once per
* every `wait` milliseconds (or once per browser frame). The throttled function
* comes with a `cancel` method to cancel delayed `func` invocations and a
* `flush` method to immediately invoke them. Provide `options` to indicate
* whether `func` should be invoked on the leading and/or trailing edge of the
* `wait` timeout. The `func` is invoked with the last arguments provided to the
* throttled function. Subsequent calls to the throttled function return the
* result of the last `func` invocation.
*
* **Note:** If `leading` and `trailing` options are `true`, `func` is
* invoked on the trailing edge of the timeout only if the throttled function
* is invoked more than once during the `wait` timeout.
*
* If `wait` is `0` and `leading` is `false`, `func` invocation is deferred
* until the next tick, similar to `setTimeout` with a timeout of `0`.
*
* If `wait` is omitted in an environment with `requestAnimationFrame`, `func`
* invocation will be deferred until the next frame is drawn (typically about
* 16ms).
*
* See [David Corbacho's article](https://css-tricks.com/debouncing-throttling-explained-examples/)
* for details over the differences between `throttle` and `debounce`.
*
* @since 0.1.0
* @category Function
* @param {Function} func The function to throttle.
* @param {number} [wait=0]
* The number of milliseconds to throttle invocations to; if omitted,
* `requestAnimationFrame` is used (if available).
* @param {Object} [options={}] The options object.
* @param {boolean} [options.leading=true]
* Specify invoking on the leading edge of the timeout.
* @param {boolean} [options.trailing=true]
* Specify invoking on the trailing edge of the timeout.
* @returns {Function} Returns the new throttled function.
* @example
*
* // Avoid excessively updating the position while scrolling.
* jQuery(window).on('scroll', throttle(updatePosition, 100))
*
* // Invoke `renewToken` when the click event is fired, but not more than once every 5 minutes.
* const throttled = throttle(renewToken, 300000, { 'trailing': false })
* jQuery(element).on('click', throttled)
*
* // Cancel the trailing throttled invocation.
* jQuery(window).on('popstate', throttled.cancel)
*/
function throttle(func, wait, options) {
let leading = true;
let trailing = true;

if (typeof func !== "function") {
throw new TypeError("Expected a function");
}
if (isObject(options)) {
leading = "leading" in options ? !!options.leading : leading;
trailing = "trailing" in options ? !!options.trailing : trailing;
}
return debounce(func, wait, {
leading,
trailing,
maxWait: wait,
});
}

export default throttle;

由1px问题引发的rem方案

面试官问,写过 h5 吧?1px 问题遇到过吧?怎么解决呢?

  • 灵魂三问!别急,慢慢分析。

什么是 1px 问题?

  • 一句话总结,就是涉及到 1px 的属性,在某些手机浏览器里,不能正常显示,有时太细甚至不显示;有时太粗,明显宽于 1px。即 1px 这个度量单位失真了。
  • 再延伸一下,这其实是一类失真问题的统称,不止局限于 1px,我们讨论的意义在于,知其原因,晓其方法。

基本概念 ppi dpr

  • 深入讨论之前,先看几个概念。ppi、dpr、dip
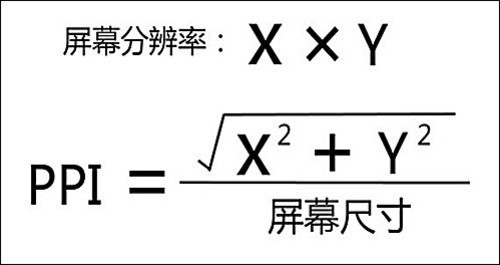
  • ppi:pixels per inch。每英寸对角线上所拥有的像素。计算公式为:ppi 手机屏幕的 ppi 当达到一定数值时,人眼就分辨不出颗粒感。
  • dpr:device pixel ratio。设备像素比。有些高清屏幕为了追求高 ppi,增大了设备像素。在原本 1 个格子里加倍了像素,让人眼感觉更加清晰。比如原来是 1x1 的方格,dpr 为 2 时就是 2x2。
  • dip:device independent pixel。设备独立像素,是指一种换算机制。由于高清屏幕像素点过多,如果按照原来的像素数显示,由于屏幕实际尺寸不会变的很大(至少不会 2、3 倍的增加),所以会导致图像过小,以至于人眼反而看不清。所以设备自动进行了换算,得出了这个意为与设备无关的像素值,也可用来描述图像相对的大小。

何时发生?

  • 我们写的 css 像素,实际上就是换算后的 dip。设备根据不同 dpr,再反推出到底应该渲染多少实际的设备像素。
  • 当高清屏 dpr 大于 1 时。相当于放大了整个页面,所有单位相当于放大了 dpr 倍。此时写个 1px,如果 dpr 是 2,那么等于设备应该渲染 0.5px 的 dip。
  • 然而,问题关键来了。有时这个 0.5 会被四舍五入为 1。这样就整整差了 2 倍。所以看起来线条变粗了。

如何解决

方案一大类:跳过会出问题的属性,如 border。用其他方案替代

  • 把 border 颜色设为透明,然后加上 border-image。缺点:有点 low,生生把灵活的 css 变成了硬编码,随便改个啥就得换图。
  • box-shadow 模拟 border,四个方向分别写阴影。缺点:不能圆角了,即 border-radius 无法模拟。颜色也不准确,因为有阴影。
  • 使用伪元素,造个“替身”。先放大 n 倍,再 transform 缩小 1/n。缺点:有些 html 元素不能用伪元素。
  • 用 svg 整个绘图,画出个 1px。然后作为背景图使用,是上面第一个方法的升级。有个插件 postcss-write-svg,可以将 svg 画好插入 css。

方案二大类:模拟 0.5px 或 0.33px,使其生效

  • WWDC2014 上提到了,直接就用 0.5px,ios8 以上支持小数 px,缺点:安卓不鸟你
  • 使用 rem。根据 dpr 动态换算 viewport 的缩放比。如为 2 就缩小到 0.5 倍,为 3 就 0.333。由于整个页面已被缩小,故 1px 会正常显示为缩小后的长度。设计师很满意!程序员喘口气!实测,修改后实际是改变了屏幕视口的宽高,即修改了 dip。也有缺点:缩放比太小时,导致缩小后的 1px,小于了 0.5px,有时还是会被四舍五入舍去。可以规避,缩放比别太小即可。

pubsub-vs-observer

面试官问,发布订阅和观察者有啥区别?

一脸懵逼?仔细想想,不难。且听娓娓道来。

什么是发布订阅

  • 你想知道某事发生,就需要实时监控着,时不时去看看,到底发没发生?
  • 但这很傻,到底应该多久看一次呢?而且总去看也不是事儿,所以你问我能不能主动告诉你呢?
  • 答案终于呼之欲出:能啊,你订阅我,我就给你发布!

每个人都用过!

  • js 的事件模型其实就是发布订阅!事件都是不一定啥时发生的,所以我们想要监控事件的发生,就要提前写好相应的回调,相当于订阅了这个事件的发生。而 js 引擎就负责实现其中逻辑。最终事件由触发者来触发,这里可以是真实事件,也可以是代码模拟出的。所以发布订阅也可称为自定义事件。

最简单的发布订阅

  • A 想知道 B 是否发生,很简单,A 订阅 B,B 发布即可。代码如下:
1
2
3
4
5
6
7
8
9
10
11
12
13
14
15
16
17
18
19
20
21
22
23
24
25
26
27
// B为发布者
const B = {
cbList: [], // 需把所有订阅者想做的事都存起来
onSub(cb) {
// 被订阅时的动作
this.cbList.push(cb);
},
pub() {
// 发布时依次执行列表里的回调
for (let index = 0; index < this.cbList.length; index++) {
const cb = this.cbList[index];
cb.apply(this, arguments);
}
},
};
// A为订阅者,诉求很简单,告诉我!
const A = {
tellMe(msg) {
console.log("tellMe", msg);
},
tellMeAgain(msg) {
console.log("tellMeAgain", msg);
},
};
B.onSub(A.tellMe); // A订阅了B
B.onSub(A.tellMeAgain); // A又订阅了B
B.pub("我发生了");

两个小问题

  • 现在 A 只知道 B 发生了,其他关于 B 的事情一概不知。假设还想知道 B 结束了,咋办?
  • A 一旦订阅了 B,再想反悔不想订阅了,好像做不到。
  • 所以,上述最简单的例子可以再改改,加个订阅的类型,以及支持取消订阅。
1
2
3
4
5
6
7
8
9
10
11
12
13
14
15
16
17
18
19
20
21
22
23
24
25
26
27
28
29
30
31
32
33
34
35
36
37
38
39
40
41
42
43
44
// B为发布者
const B = {
cbObj: {}, // 需把所有订阅者想做的事都存起来
onSub(type, cb) {
// 被订阅时的动作
if (!this.cbObj[type]) {
this.cbObj[type] = [];
}
this.cbObj[type].push(cb);
},
onCancelSub(type, cb) {
if (!this.cbObj[type]) {
return false;
}
for (let len = this.cbObj[type].length; len > 0; len--) {
const fn = this.cbObj[type][len - 1];
if (fn === cb) {
this.cbObj[type].splice(len - 1, 1);
}
}
},
pub(...rest) {
// 发布时依次执行列表里的回调
const type = rest.shift();
for (let index = 0; index < this.cbObj[type].length; index++) {
const cb = this.cbObj[type][index];
cb.apply(this, rest);
}
},
};
// A为订阅者,诉求很简单,告诉我!
const A = {
tellMe(msg) {
console.log("tellMe", msg);
},
tellMeAgain(msg) {
console.log("tellMeAgain", msg);
},
};
B.onSub("start", A.tellMe); // A订阅了B
B.onCancelSub("start", A.tellMe); // A取消订阅了B
B.onSub("over", A.tellMeAgain); // A又订阅了B
B.pub("start", "我发生了");
B.pub("over", "我结束了");
  • 至此,其实已经实现了一般意义上的观察者模式,发现了吗?最简单的发布订阅就是观察者模式!
  • 那标准意义上的发布订阅还有什么区别呢?答案马上揭晓
  • 上述的例子有点死板,因为无论谁订阅,订阅谁,总是要直接调用相关对象的方法,这就形成了深耦合,不利于扩展,所以能否做一些统一的封装工作,帮助我们管理这些订阅发布的动作?
1
2
3
4
5
6
7
8
9
10
11
12
13
14
15
16
17
18
19
20
21
22
23
24
25
26
27
28
29
30
31
32
33
34
35
36
37
38
39
40
41
42
43
44
45
46
47
48
49
50
51
52
// B改为通用的发布者
const PUB = {
cbObj: {}, // 需把所有订阅者想做的事都存起来
onSub(type, cb) {
// 被订阅时的动作
if (!this.cbObj[type]) {
this.cbObj[type] = [];
}
this.cbObj[type].push(cb);
},
onCancelSub(type, cb) {
if (!this.cbObj[type]) {
return false;
}
for (let len = this.cbObj[type].length; len > 0; len--) {
const fn = this.cbObj[type][len - 1];
if (fn === cb) {
this.cbObj[type].splice(len - 1, 1);
}
}
},
pub(...rest) {
// 发布时依次执行列表里的回调
const type = rest.shift();
for (let index = 0; index < this.cbObj[type].length; index++) {
const cb = this.cbObj[type][index];
cb.apply(this, rest);
}
},
};
// 部署通用版发布
var deployPub = function (obj) {
for (var i in PUB) {
obj[i] = PUB[i];
}
};
const B = {};
deployPub(B); //这样B就具有了发布功能
// 继续用A测试
const A = {
tellMe(msg) {
console.log("tellMe", msg);
},
tellMeAgain(msg) {
console.log("tellMeAgain", msg);
},
};
B.onSub("start", A.tellMe); // A订阅了B
B.onCancelSub("start", A.tellMe); // A取消订阅了B
B.onSub("over", A.tellMeAgain); // A又订阅了B
B.pub("start", "我发生了");
B.pub("over", "我结束了");
  • 再仔细观察一下,是不是貌似不需要把 B 每次都变成所谓的通用发布者,因为 A 订阅时,已经不关注订阅的对象是谁了,而只关注订阅的事件类型。
  • 所以,可以进一步理解为发布订阅模式就是这样一种模式,即通过“中间人”的角色,完成所有类型事件的订阅。这个中间人只负责收集订阅者,和向所有订阅者发布消息。
1
2
3
4
5
6
7
8
9
10
11
12
13
14
15
16
17
18
19
20
21
22
23
24
25
26
27
28
29
30
31
32
33
34
35
36
37
38
39
40
41
42
43
44
// PUB即为中间人
const PUB = {
cbObj: {}, // 需把所有订阅者想做的事都存起来
onSub(type, cb) {
// 被订阅时的动作
if (!this.cbObj[type]) {
this.cbObj[type] = [];
}
this.cbObj[type].push(cb);
},
onCancelSub(type, cb) {
if (!this.cbObj[type]) {
return false;
}
for (let len = this.cbObj[type].length; len > 0; len--) {
const fn = this.cbObj[type][len - 1];
if (fn === cb) {
this.cbObj[type].splice(len - 1, 1);
}
}
},
pub(...rest) {
// 发布时依次执行列表里的回调
const type = rest.shift();
for (let index = 0; index < this.cbObj[type].length; index++) {
const cb = this.cbObj[type][index];
cb.apply(this, rest);
}
},
};
// 继续用A测试
const A = {
tellMe(msg) {
console.log("tellMe", msg);
},
tellMeAgain(msg) {
console.log("tellMeAgain", msg);
},
};
PUB.onSub("start", A.tellMe); // A订阅了start
PUB.onCancelSub("start", A.tellMe); // A取消订阅了start
PUB.onSub("over", A.tellMeAgain); // A又订阅了over
PUB.pub("start", "我发生了");
PUB.pub("over", "我结束了");
  • 其实还可以再加上更高级的一些功能,例如支持离线消息,即发布时还没订阅,订阅晚于发布时间;还有支持命名空间等,因为总是把所有类型的事件放在一起,用一个字符串表示,难免最后会乱。最后是终极代码,直接照抄了原书作者的版本。
1
2
3
4
5
6
7
8
9
10
11
12
13
14
15
16
17
18
19
20
21
22
23
24
25
26
27
28
29
30
31
32
33
34
35
36
37
38
39
40
41
42
43
44
45
46
47
48
49
50
51
52
53
54
55
56
57
58
59
60
61
62
63
64
65
66
67
68
69
70
71
72
73
74
75
76
77
78
79
80
81
82
83
84
85
86
87
88
89
90
91
92
93
94
95
96
97
98
99
100
101
102
103
104
105
106
107
108
109
110
111
112
113
114
115
116
117
118
119
120
121
122
123
124
var Event = (function () {
var global = this,
Event,
_default = "default";
Event = (function () {
var _listen,
_trigger,
_remove,
_slice = Array.prototype.slice,
_shift = Array.prototype.shift,
_unshift = Array.prototype.unshift,
namespaceCache = {},
_create,
find,
each = function (ary, fn) {
var ret;
for (var i = 0, l = ary.length; i < l; i++) {
var n = ary[i];
ret = fn.call(n, i, n);
}
return ret;
};
_listen = function (key, fn, cache) {
if (!cache[key]) {
cache[key] = [];
}
cache[key].push(fn);
};
_remove = function (key, cache, fn) {
if (cache[key]) {
if (fn) {
for (var i = cache[key].length; i >= 0; i--) {
if (cache[key][i] === fn) {
cache[key].splice(i, 1);
}
}
} else {
cache[key] = [];
}
}
};
_trigger = function () {
var cache = _shift.call(arguments),
key = _shift.call(arguments),
args = arguments,
_self = this,
ret,
stack = cache[key];
if (!stack || !stack.length) {
return;
}
return each(stack, function () {
return this.apply(_self, args);
});
};
_create = function (namespace) {
var namespace = namespace || _default;
var cache = {},
offlineStack = [], // 离线事件
ret = {
listen: function (key, fn, last) {
_listen(key, fn, cache);
if (offlineStack === null) {
return;
}
if (last === "last") {
offlineStack.length && offlineStack.pop()();
} else {
each(offlineStack, function () {
this();
});
}
offlineStack = null;
},
one: function (key, fn, last) {
_remove(key, cache);
this.listen(key, fn, last);
},
remove: function (key, fn) {
_remove(key, cache, fn);
},
trigger: function () {
var fn,
args,
_self = this;
_unshift.call(arguments, cache);
args = arguments;
fn = function () {
return _trigger.apply(_self, args);
};
if (offlineStack) {
return offlineStack.push(fn);
}
return fn();
},
};
return namespace
? namespaceCache[namespace]
: (namespaceCache[namespace] = ret)
: ret;
};
return {
create: _create,
one: function (key, fn, last) {
var event = this.create();
event.one(key, fn, last);
},
remove: function (key, fn) {
var event = this.create();
event.remove(key, fn);
},
listen: function (key, fn, last) {
var event = this.create();
event.listen(key, fn, last);
},
trigger: function () {
var event = this.create();
event.trigger.apply(this, arguments);
},
};
})();
return Event;
})();
  • 最后总结一下,观察者模式是这种模式的最初思想,为了实现不同对象间的解耦合。
  • 自此基础上发展出了发布订阅模式,通过中间人的角色,统一来管理所有消息的订阅和发布。
  • 后续的功能,例如离线消息、命名空间等,更是为这一模式更加增光添彩如虎添翼。
  • 总之,这种设计模式的思想非常经典,也应用于很多大型复杂软件之中,掌握这种模式还是非常必要的。

最后补充

  • 其实还有一种写法是,订阅者和发布者的角色不局限于某一对象,即订阅者同时也可发布,发布者也可订阅。
  • 看起来更好理解,更像是字面意思上的观察者,互相订阅,也是互相观察。
  • 这种写法的最简版(观察者模式)就是互相观察,深度耦合;升级版也是使用中间人,统一管理订阅发布行为,从而进化为发布订阅模式。

antd-combobox

1. combobox

  • 使用antd时,需要一个combobox场景。即选择框也可输入自定义内容。
  • 但是antd貌似没有这个组件,可以用AutoComplete组件来实现。

2. 实现要点

  • 1
    2
    3
    4
    5
    6
    7
    8
    <AutoComplete
    value={payment_terms}
    style={{ width: 100 }}
    onChange={(value) => {
    this.changePaymentTerm(`${this.validatePaymentTerms(value)}`);
    }}
    dataSource={paymentTermsList.map((item) => `${item}`)}
    ></AutoComplete>
  • 提前设置好dataSource,即可选择的列表。
  • 因为AutoComplete就是可以输入来搜索的,所以就实现了既可以输入,也可以搜索的功能。
  • 注意点:控制onChange,既可以实现输入内容校验和替换,也是设置了当输入自定义内容时,即为下拉选择无可选项。直接设置值即可。
1
2
3
4
5
6
7
8
9
10
// 强制处理为数字
validatePaymentTerms = (value) => {
if (Number.isNaN(Number(value))) {
return 0;
}
if (value < 0) {
return Math.abs(value);
}
return Math.round(value);
};

bpmn-js自定义开发

1. 基于开源工具库 bpmn-js 5.0 版本,对源码进行修改、自定义,通过二次开发实现。

2. 代码主要改动介绍

  • styles/assets 样式文件,左侧调色板的图标样式
  • lib/Viewer.js bpmn-moddle 是引用的第三方库,内含所有 bpmn 所用的图形,事件,动作等
  • lib/draw/BpmnRenderer.js 添加/修改 渲染类型
  • lib/features/context-pad/ContextPadProvider.js 添加/修改上下文面板菜单
  • lib/features/modeling/ElementFactory.js 修改图形的默认尺寸
  • lib/features/palette/PaletteProvider.js 修改调色板菜单内容,分组等
  • node_modules\bpmn-js-properties-panel\lib\provider\camunda\CamundaPropertiesProvider.js 修改右侧面板选项卡内容

3. 修改后示例项目

  • 依赖引入自有 git 项目,每次库有更新,需要手动执行 npm up 来更新库
  • 使用时可自定义节点属性,进行读写

小程序框架情况调研

本文探索小程序框架和组件库,这里主要指微信小程序,后续不排除可能需要开发支付宝小程序/XX 小程序等等,所以多平台多端的兼容性也是一项考察指标。下文列举较为流行的框架和组件库。

1. 基本需求

  • 尽量摆脱“微信语法”-WXML、WXSS、WXS。即使微信语法与 mvvm 框架语法类似,但仍免不了学习成本。
  • 支持 vue 语法或 react 语法,可快速上手

2. 进阶需求

  • 一套代码生成多平台应用
  • 支持 npm
  • 更多组件库支持

3. 框架对比

名称 github stars 语法规范 多平台支持 npm 备注 踩坑记录
Tencent / wepy 18.2k 类 vue,WXML、WXSS、WXS 微信、支付宝 支持 支持 ES2015+特性,支持多种编译器,支持多种插件处理,支持 Sourcemap,ESLint 等小程序细节优化 1.新版本 2.0 暂不支持支付宝,还是 alpha 版 2.编辑器对.wepy 文件支持不够
Meituan-Dianping / mpvue 17.9k vue 微信、百度、头条、支付宝 支持 完整的 Vue.js 开发体验 H5 代码转换编译成小程序目标代码的能力 1.文档将近一年没有维护 新版本 2.0 没有新文档 2.头条小程序报错 bug,暂未解决 3.百度真机调试困难
NervJS / taro 20.0k react 微信、百度、支付宝、头条、 移动端(React-Native) npm/yarn 完整的 react 开发体验
didi / chameleon 5.4k 类 vue ,CML + CMSS + JS 微信、百度、支付宝、移动端(Weex)、快应用 qq(alpha) 支持 丰富的官方 api 库、组件库 构建工具安装困难
dcloudio / uni-app 9.3k vue 微信、百度、支付宝、头条、 移动端(Weex) 支持 官方组件库、api 库 有专用定制 ide: HBuilder

4. 组件库

名称 github stars 备注
Tencent / weui-wxss 10.0k 微信官方组件库 WeUI 的小程序版本
youzan / vant-weapp 9.7k 有赞移动端 Vue 组件库 Vant 的小程序版本
TalkingData / iview-weapp 4.6k iview 小程序版
meili / minui 3.2k 可通过自有构建工具单独安装单个组件
wux-weapp / wux-weapp 3.4k
weilanwl / ColorUI 4.7k css 库

微信公众平台-微信JS-SDK接入

1. 申请和认证

  • 在微信公众平台申请开发者 ID,通过订阅号或服务号认证后,可取得相应接口权限

2. 相关配置

  • 在微信公众平台登录认证过的公众号,进行开发者相关配置,至少填写如下信息
  • appID–属于该开发者 ID 的
  • appsecret–属于该开发者 ID 的
  • 一个能够响应微信验证身份请求的服务接口地址,端口必须为 80(http)或 443(https)
  • 一个自定义的 token,用于微信身份验证
  • 加密方式,用于加密验证的消息。
  • 注:按微信要求,验证接口需原样返回请求参数,故可不做校验,直接返回即可,但安全性不能保证,推荐真正校验通过再返回
  • JS 接口安全域名–一个公众号最多可绑定 3 个安全域名,每月有三次保存机会。绑定时还需将一个微信提供的文本文件置于项目根目录(视为静态资源),确保配置的安全域名根目录下能够访问该文件。
  • 全部配置并至少保存成功一次,即为接入微信公众平台成功,可调用该公众号拥有权限的所有微信公众平台接口

3. 采用 js-sdk 调用接口,需验证身份,包括如下步骤

  • 获取 access_token–公众号的全局唯一接口调用凭据。每次获取新的时,旧的在 5 分钟后失效,有效期 2 小时。微信要求开发者在全局缓存该 token,因获取 token 接口每日有调用次数限制 2000。
  • 获取 jsapi_ticket–公众号用于调用微信 JS 接口的临时票据。同上,有效期 2 小时,调用次数限制 2000,也需要全局缓存
  • 开发者需按照 https://mp.weixin.qq.com/wiki?t=resource/res_main&id=mp1421141115 所提供的算法在服务端进行签名,返回客户端此次调用微信接口的临时签名
  • 至此,完成了微信公众平台-微信 JS-SDK 的接入

4. 调用微信的接口之前,需调用如下接口

  • 调用 wx.config 接口,注入配置信息(包括签名、appId、本次需要调用的接口列表等)。同一个 url 仅需调用一次
  • 调用 wx.ready 接口,在成功回调中,可调用所有本次想使用的微信接口功能,包括分享、图形、音频等。

5. 页面引入 sdk 文件

mongoose

1. 什么是 mongoose

  • Mongoose 是在 node.js 环境下对 mongodb 进行便捷操作的对象模型工具

2. 安装

  • 依赖 nodejs 和 mongodb
  • npm install mongoose –save
  • require(‘mongoose’)

3. connect 用于创建数据库连接

  • mongoose.connect(url(s), [options], [callback])
    • //url(s):数据库地址,可以是多个,以,隔开
    • //options:可选,配置参数
    • //callback:可选,回调
  • mongoose.connect(‘mongodb://用户名:密码@127.0.0.1:27017/数据库名称’)
  • 连接多个 mongoose.connect(‘urlA,urlB,…’, {mongos : true })
  • mongoose.disconnect() 断开连接

4. Schema–Each schema maps to a MongoDB collection and defines the shape of the documents within that collection.

  • 主要用于定义 MongoDB 中集合 Collection 里文档 document 的结构,
  • 可以理解为 mongoose 对表结构的定义
  • (不仅仅可以定义文档的结构和属性,还可以定义文档的实例方法、静态模型方法、复合索引等),
  • 每个 schema 会映射到 mongodb 中的一个 collection,
  • schema 不具备操作数据库的能力
  • String 字符串 Number 数字 Date 日期 Buffer 二进制 Boolean 布尔值 Mixed 混合类型 ObjectId 对象 ID Array 数组
  • 如果需要在 Schema 定义后添加其他字段,可以使用 add()方法

5. Model–Models are fancy constructors compiled from Schema definitions. An instance of a model is called a document.

  • 是由 Schema 编译而成的假想(fancy)构造器,具有抽象属性和行为。
  • Model 的每一个实例(instance)就是一个 document,document 可以保存到数据库和对数据库进行操作。
  • 简单说就是 model 是由 schema 生成的模型,可以对数据库的操作。
  • 实例化文档 document,通过对原型 Model 使用 new 方法,实例化出文档 document 对象
  • 文档保存。必须通过 save()方法,才能将创建的文档保存到数据库的集合中
  • 实例方法和静态方法.区别在于,静态方法是给 model 添加方法,实例方法是给 document 添加方法
  • Mongoose 会将集合名称设置为模型名称的小写版。如果名称的最后一个字符是字母,则会变成复数;如果名称的最后一个字符是数字,则不变

6. Documents–Each document is an instance of its Model.

7. 文档新增

  • 实例化 model,然后 save()
  • 使用模型 model 的 create()方法,Model.create(doc(s), [callback])
  • 最后一种是模型 model 的 insertMany()方法,Model.insertMany(doc(s), [options], [callback])

8. 文档查询

  • find()
    • 第一个参数表示查询条件,第二个参数用于控制返回的字段,第三个参数用于配置查询参数,第四个参数是回调函数
    • Model.find(conditions, [projection], [options], [callback])
  • findById()
    • Model.findById(id, [projection], [options], [callback])
  • findOne()
    • 该方法返回查找到的所有实例的第一个
  • 文档查询中,常用的查询条件如下 (Query and Projection Operators)
    • $or     或关系
    • $nor     或关系取反
    • $gt     大于
    • $gte     大于等于
    • $lt     小于
    • $lte     小于等于
    • $ne     不等于
    • $in     在多个值范围内
    • $nin     不在多个值范围内
    • $all     匹配数组中多个值
    • $regex    正则,用于模糊查询
    • $size    匹配数组大小
    • $maxDistance  范围查询,距离(基于 LBS)
    • $mod     取模运算
    • $near     邻域查询,查询附近的位置(基于 LBS)
    • $exists    字段是否存在
    • $elemMatch  匹配内数组内的元素
    • $within    范围查询(基于 LBS)
    • $box      范围查询,矩形范围(基于 LBS)
    • $center    范围醒询,圆形范围(基于 LBS)
    • $centerSphere  范围查询,球形范围(基于 LBS)
    • $slice     查询字段集合中的元素(比如从第几个之后,第 N 到第 M 个元素

9. 文档更新

  • Model.update(conditions, doc, [options], [callback])
    • 第一个参数 conditions 为查询条件,第二个参数 doc 为需要修改的数据,第三个参数 options 为控制选项,第四个参数是回调函数
    • options 有如下选项
      • safe (boolean): 默认为 true。安全模式。
      • upsert (boolean): 默认为 false。如果不存在则创建新记录。
      • multi (boolean): 默认为 false。是否更新多个查询记录。
      • runValidators: 如果值为 true,执行 Validation 验证。
      • setDefaultsOnInsert: 如果 upsert 选项为 true,在新建时插入文档定义的默认值。
      • strict (boolean): 以 strict 模式进行更新。
      • overwrite (boolean): 默认为 false。禁用 update-only 模式,允许覆盖记录。
  • updateMany()与 update()方法唯一的区别就是默认更新多个文档,即使设置{multi:false}也无法只更新第一个文档
  • 如果需要更新的操作比较复杂,可以使用 find()+save()方法来处理
  • updateOne()方法只能更新找到的第一条数据,即使设置{multi:true}也无法同时更新多个文档
  • findOne() + save()
  • Model.findOneAndUpdate([conditions], [update], [options], [callback])
  • Model.findByIdAndUpdate([conditions], [update], [options], [callback])
  • 操作符 Update Operators

10. 文档删除

  • remove
    • model.remove(conditions, [callback])
    • document.remove([callback])
  • Model.findOneAndRemove(conditions, [options], [callback])
  • Model.findByIdAndRemove(id, [options], [callback])

11. 查询后处理

  • sort 排序 按某字段排序
  • skip 跳过 做任何操作前跳过若干
  • limit 限制 规定最大返回数量
  • select 显示字段 规定显示的字段
  • count 计数 计数查询结果
  • distinct 去重 统计某字段值的情况
  • exect 执行 执行最终查询

12. 文档验证

  • Validation is defined in the SchemaType 定义在 schema 中
  • Validation is middleware. Mongoose registers validation as a pre(‘save’) hook on every schema by default.中间件,默认注册了 pre(‘save’) 钩子
  • You can manually run validation using doc.validate(callback) or doc.validateSync() 可手动运行
  • Validators are not run on undefined values. The only exception is the required validator. 未定义值不会校验
  • Validation is asynchronously recursive; when you call Model#save, sub-document validation is executed as well. If an error occurs, your Model#save callback receives it 嵌套异步执行
  • Validation is customizable 自定义
  • 规则
    • required: 数据必须填写
    • default: 默认值
    • validate: 自定义匹配
    • min: 最小值(只适用于数字)
    • max: 最大值(只适用于数字)
    • match: 正则匹配(只适用于字符串)
    • enum: 枚举匹配(只适用于字符串)

在linux从0搭建node环境

1. 下载压缩包(二进制,非源码)

2. 解压缩即安装

  • 选择解压目录
  • 命令 tar -xvf node-v8.10.0-linux-x64.tar.gz
  • 解压到当前目录,也可改变目标目录 -C

3. 全局使用

  • 想在全局环境使用 node 命令及 npm 全局安装的包
  • 需要向系统声明 node 可执行文件及全局包的位置 →PATH 环境变量
  • /usr/bin/ 、/usr/local/bin。。。
  • 方法:建立软链、直接修改环境变量
  • 软链:命令 ln -s /usr/local/node-v8.10.0-linux-x64/bin/node /usr/bin/node 同理建立 npm pm2 的,pm2 可先用 npm 安装
  • 修改变量:export PATH=/usr/local/node-v8.10.0-linux-x64/bin:$PATH (针对当前用户)
  • 多种途径:/etc/profile、/etc/profile.d、/home/dev-user/.bashrc 等
  • 注意:由于 npm 等包经常需要读写权限,还需要赋予 node 所在位置的读写权限给当前用户(修改属主也可)。
  • sudo chown dev-user:dev-user /usr/local/node-v8.10.0-linux-x64/ -R